My Gaming Casing - PowerLogic Atrix 5000
For many years, I used only decent casings for my PC. I mean purely simple tower casing without any extra stuff and 'bling' - I just didn't care.
Finally I took a chance to own a better casing.
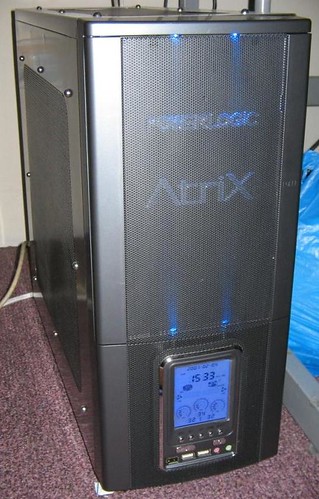 |  |
Im not a big fan of "'blinging' your PC to the extreme", I just like to keep it nice, simple but attractive. I found that PowerLogic Atrix 5000 is just the one for me. Cost me about RM170 though.
There are 2 best possible ways to suck air into the casing. One is at the leftside of the casing and the other is underneath the top of the casing. This excludes the rear 90 mm fan which I think is a necessity for all casings today. One 120 mm LED fan is provided for the leftside air intake, while the top spot is provided without any fan, we need to install our own.
There's an internal cylindrical plastic installed inside the left casing panel, directly above the CPU location, which is meant to draw air directly on top of the CPU heatsink/fan for cooling. For better result, this plastic can also be replaced with another fan to blast air to cool the CPU more efficiently.
When I am in a heavy gaming session at home, I can summarised that this casing works fine in eliminating the heat inside it. When I was still using X800 GTO, the heat from this graphics card is directly blown outside the casing using its dual-slot cooling solution. However, my current 7800 GT is a single-slot cooling method, so you know the rest of it. I initially thought that the casing internal temperature would be way higher, but the reading on the front LCD display showed no differences (possibly only a fraction of a degree Celcius). So, I think that's good enough.
The front LCD display is configured to display temperature, HDD RPM, CD RPM and time. Those readings are made possible by utilising the sensors supplied together with the casing. The illuminating PowerLogic logo in front can be turned on and off, so that's a bit of flexibility there anyway (this bling is useless during daytime or under a strong lighting).
Here's the actual spec from Leapfrog, the distributor of the casing:
Specifications
![]() Multi-function Digital Controller for 2 Fans (CPU / HDD or VGA)
Multi-function Digital Controller for 2 Fans (CPU / HDD or VGA)
![]() Temperature display for CPU, VGA, HDD and Case Temperature
Temperature display for CPU, VGA, HDD and Case Temperature
![]() Multi-function display for Clock, Date
Multi-function display for Clock, Date
![]() 12 cm Color LED Side Fan and 9 cm Back Fan built-in
12 cm Color LED Side Fan and 9 cm Back Fan built-in
![]() Ultra Cooling System with multi-ways Grid + Filter System
Ultra Cooling System with multi-ways Grid + Filter System
![]() Only 1 screw reveals the whole case
Only 1 screw reveals the whole case
![]() Screwless, Tool-less FDD, HDD and Expansion Slots
Screwless, Tool-less FDD, HDD and Expansion Slots
![]() Screwless front panel (Snap On/Off)
Screwless front panel (Snap On/Off)
![]() Install up to 6 Fans : 2 x Rear, 2 x Front, 1 x Side, 1 x Top
Install up to 6 Fans : 2 x Rear, 2 x Front, 1 x Side, 1 x Top
![]() High Quality 0.8 mm SECC Steel, All edges debarred for safety
High Quality 0.8 mm SECC Steel, All edges debarred for safety
![]() Fits in all motherboard up to 244 mm
Fits in all motherboard up to 244 mm
![]() Drive Bay : 4 x 5.25 External, 2 x 3.5 External and 6 x 3.5 Internal
Drive Bay : 4 x 5.25 External, 2 x 3.5 External and 6 x 3.5 Internal
Well, I guess there are more to it than what I can observed. Overall, PowerLogic Atrix 5000 will definitely look stunning in the room. With such a good pricing, I find it hard to resist. Of course the internal finishing is not as good as those from Lian Li, Coolermaster (I did find some sharp edges around inside the aluminium bays), but this casing is worth buying!
posted by banjarconverto @ 3:51 PM
56 Comments
![]()
![]()


56 Comments:
Hey, nice mini review. OI have helped my friend to fix one rig using this casing too. But I am having problem with the turning on the "blue spotlight" at the front. Any tips for me? And how did you placed the temp sensors? I intend to just stick them on their hs, not accurate I know, just want to have a general feel, that's all. Please comment.
thank you,
emm, to turn on the blue lighting in front (where all display of temp, rpm sit), i think you have to make sure two 4-pin power connector are connected to power supply. these two connectors originated from the casing itself. another thing, the blue lighting on the logo "Power Atrix" can be turn on and off. to find the button, just open the faceplate that covers the cd-roms and floppy area. then on top or above) of the floppy/hdd area, there's a small, silvery button. this button is the switch.
emm, the sensors. they are quite difficult to be placed actually. actually i just placed the temp sensors only, on top of hdd. the rest, i just didn't care..hehehe. see, to get the RPM reading of hdd or cd-rom, the sensor has to be put on one of the IDE pin on the IDE device; that's quite tedious. and for CPU temp, the correct way is to place it very close to CPU before the heatsink isplaced; that's even more tedious. so, you can put it anywhere just to have fun with it..hehhe
hi there.......good review
just wondering if u can help me out abit.
ive added 2 extra fans at the front of the casing.
In the front panel of the casing,next to fan 1 and fan 2, it shows 0000 and it keeps blinking.
Any idea how to resolve this?
I bought the casing at another place at the rest of the hardware at another place and left it at the shop to assemble............i wonder if the casing came with a manual and if the shop lost it in the process of assebling.
ive even tried to find opnline for any info or manual(if there is any), alas..none to be found
Thanks in ahead
thank you jo,
in regards of getting the RPM reading of the fans, hmm..actually, i stuck on this matter myself. because the only way to measure this is by measuring the current on the fan's 3rd pin (usually provided onboard the mainboard). however i didn't find this facility provided by the casing. the other possibility is, i didn't understand the manual myself :).
the manual is definitely on the negative side of the casing's review: it's just a piece of paper, small one, making it possible to be ignored. you couldn't make much out of it though. sorry i couldn't help you much on this.
Thanks to your stupid review, I actually went and bought myself this casing. I hate you.
In the first 2 hours, the front left foot fell of and the plastic clips that holds my sound card broke. I barely even touch it.
The sensors are a joke, and the plastics that holds the Harddisk are make of the poorest quality.
The casing is so poorly insulated that it short circuited my main board and will have to wait a whole month for a replacement. You bastard.
I went back to the shop to replace the broken parts but they say the warranty only covers the stupid polymer display.
I hate you I hate you I hate you.
Dear Anonymous : 3:07 PM, June 17, 2006
u only have urself to blame 4 ur stupid actions.
when u bought the casing, didnt u use ur common sense as in to ask what does the warranty cover?
ive read his comment and bought it and succesfully been using it for a month (touch wood-ur head i guess coz its empty-)
u know what's the best part......this is the first time im buying a computer and built it up succesfully alone, yup with a lil bit of assitance from the shop for assemble
even i, the novice had the common sense to ask what is covered in the guarantee of my purchase on each part of the computer(every single hardware)
so dont blame others for ur mistake..i bet u must have bought the casing second hand or got it dirt cheap.....................
dear banjarconverto, i hope u will not let this type of ppl's coment hurt ur feeelings.
pls keep up the good job and keep on blogging
though u couldnt solve the issue, it will be real nice if u could just take a pic of the manual and put it up online..just for personal satisfaction that ive tried every options
thanks again
wow!,
first of all, i didn't realize that there are quite a number of people who bumped into my simple review. then i relized why: Google listed my review on the first page of atrix 5000 search hits. so, possibly, this casing is available in Malaysia only.
to anonymous,
i felt sorry for your bad experience with this casing (and to others who experienced the same). with such mishaps that you've encountered, I can only think of two possiblities: either you're bluffing, or you just got the bad casing ones. to stick on the positive side, i don't think you're bluffing; the disaster was real and you cursed me to death all day and night about it. well, here's my actual take on it: you don't have even a decent skill at all in building a pc, that you should leave the job to the shop techies. And as usual, scrutinize the casing in the shop before you take it home. For the plastic retainer part, you missed this aspect, buddy..
"..The casing is so poorly insulated that it short circuited my main board and will have to wait a whole month for a replacement....". Put this sentence in any hardware forums and you could be a laughing stock, because this is entirely an installation inefficiency. You don't seem to have 'green hands' about this.
For the sensors, i'd suggest a Defi RPM meter and Defi sensors for accurate reading. Available at every Brother's shop, nationwide.
i'd like to sum up that for a RM170
worth of casing, this casing just worth it. even 'chapalang' casing cost you RM90, which i think is worth it also.
my point is clear; you just happened to have a bad day.
i realized my mistake that i didn't highlight the weakness of this casing much in the review. i'm not even a formal hardware reviewer to care enough about it. so your input, while doubtful at best, is still confined under the RM170 value..
to jo,
thanks for you backing-ups. i'll try to get the manual back (must be somewhere inside the box for the casing). if i got it, it's online :)..
to blogger,
thanks, emm..i bought it at Low Yat Plaza, KL. The shop is All IT Hypermarket, a good place to shop for PC stuff actually (while others might say differently :) )
i just load up the manual for the casing in the recent post.
hi,
just wondering about the location of the 2 front fan slots and wat size they are...also, where is the 2nd rear fan slot? lastly, if i get one i plan to use 7 fans (inc the 90mm supplied, and changing the cone to a fan) do u have any tips on the direction each one should be facing?
cheers
josh
does atrix 5000 include power supply?
no, this casing does not come with any power supply, i'm sorry to say that. sonicgear T500 power supply might add more bling to the casing tho, as it is also equipped with LED fan..
to josh, i think the front fan is meant for 80 mm fan though (kinda hard to measure the size anyway!). I don't think there's another rear fan slot, unless Leapfrog was stating that the other rear fan is the PS fan (which is lame btw). just remember, the rest of the specs are taken from Leapfrog website.
regarding the direction of the fans...hmm, normally we should have an efficient in and out airflow, not just out (suction). Usual practice would be to make the front fans, top and side (LED fan and cone/fan) function as suction and rear fans as blower (outlet). but other PC users might have different settings :)
hey, this is a great review on my newly bought casing..nice job there banjarconverto. can i ask u something bout the casing? my casing's temp indicator is stating an average of 39-48 degrees celcius for the hdd, cpu n vga..is the temp supposed to b at this rating? bcuz i din install any additional fans due to the lack of knowledge regarding this matter..plus i notice there's a fan slot on top of the casing..if i attempt to install 1 over there..should it b sucking out air of blowing air in? pls guide me..thx in advance ^^
should it b sucking out air OR* blowing air in?** my apologies for the error ^^
Nice review! And I have also purchased this (b4 reading this review). I think its very simple to install and a very good casing for its price. The guy who hates u is kinda dumb i think since I had also succesfully installed it without any mishaps. Just one question to all, there are 2 cables labelled FAN1 and FAN2 rite? Where do I attach them? Becoz they don't seem to fit into any sockets I have.. Are they supposed to be attached to the motherboard? Please help me on this someone =) Besides that this casing is awesome! =)
to atrixuser43,
i think it is quite normal to have your hdd, cpu, and vga in that temperature range. for example, my 7800 GT GPU also plays around 48 C and my CPU is about 35 C during idle (reported by third party software). so i would say, it's quite safe there.
i don't install any fan on the top fan slot myself. i would reckong, that blowing air out from taht spot would be nice, because hot air from CD-ROMs, HDDs would accumulate on top area inside the casing (warm, hence lighter air), so the top fan would catch them and blow 'em outwards. this is by logical reason though.
on the other hand, some users might want to make the top fan a sucking-air type, maybe because they want to blow hot air away from the PC user, by blowing hot air strictly from the back of the casing. it's your choice :).
to nujra,
thanks. about the fan connector, i have the same problem myself..hehehe :). obviously i can't figure out what are they for. my guess is, they are monitoring the RPM of the fans. the problem is, i don't know how to make the connection (wiring\cabling). obviously, it's not meant for the motherboard. sorry about this. i'll tell you if i can figure this out later..
Help me please !
i got my new setup last week,
and while putting all the stuff inside, at a point i noticed the led (that should be blue when pc is on) has no light... :(
what am i supposed to do ?
is there an on/off switch to this panel as well ?
thanks in advance
hi,
first of all, the blue front panel does require to be powered, which is made possible by the casing providing two 4-pin power connectors. Did you connect these two to the power supply?
Secondly, there is a power on-off button on the area above the panel , a silver button but that is for illuminating the Power Atrix logo. So, in this case, I couldn't find any.
Relating to the previous post (to 'nujra'):
remember that you ask about a peculiar type of connector provided by the casing (the one you suspected might be connected to mainboard)? I saw a type of cable: a 3-pin on one end, and 4-pin power connector on the other end. the 3-pin end is the one that must be connected to those 'peculiar' casing connector. I saw this cable while browsing Low Yat Plaza last week.
Cheers...
WOW...Im also on the fron page as I posted that im getting this case...Im in South Africa and will be 1 of the few who will actually have this case I guess as they have stopped importing it to SA( South Africa). Im getting it this Friday (18th November 2006).
Someone who I go LANing with has this case and its AMAZING!!! So it can take 6 fans! Cool...Ill need them l83r as ill be OCing and will be running an awsome PC. Im busy upgrading at the moment. Im running an AM2 3200 @ 2120Mhz, 1GB RAM, 6600GT and 2 HDDs...This case with the 2 fans it comes with will be good enough for now...
Is there anyway I can get a see through side pannel as I really want to be able to look inside my PC and then I can mod it inside...If not is it possible to remove that mesh and replace it with some plexi? Or maybe if Antec or Gigabyte or some other case company make cases with see through side pannels and the fit is the same ill definatly buy it and let you all know.
Also if I mmod the case ill definatly post some pics.
I thought your review was amazing but maybe a few pics of the case inside and the cons of the case?
Well for next time!!
Thanks
to psyclown,
regarding your idea to remove the mesh with a piece of probably perspex (fitted with LED fan perhaps :) ), i think that it could be done; providing you can peel out the riveted mesh. yes, the mesh is riveted to the side panel, not screwed. so, dig around from the modding communities, forums because definitely there's a way around this problem. good luck.. :)
well, for the pics inside the casing, i couldn't do that because currently the PC is located at some unreachable spot in my store-washing-gaming room hehehe..i value your interest in this casing, and hopefully you'll enjoy your LAN session fragging everything that moves on your monitor :))) and don't forget to post pics of your modded case.. :)
For the record, i didn't expect my review about the casing attracted much attention, as it was done with minimal act of professionalism :) hehehe..anyway, i appreciate any input from all of you..thanks
cheers..
PS: and currently i'm digging NFS Carbon every night..
hehe...NFS Carbon hasnt been released in SA yet. This is the first blog iv seen like this! Im use to forums and not this blog thing...its cool but kinda weired...I wanna know why there is SOO little info on the net about this case? It seems as if its only avalible in a few countries?
Which countries?
Also will it be possible for me to get another side pannel if I make a mistake while modding it?
I cant wait to get this case as its gonna be my first PC which I would have re-built (transfering all components from my current case to this case.)
Maybe if you find anything useful or unusual or a side pannel which will fit the case and has a perspex window please email on dvd8@bluebottle.com
Also how do I connect the on/off button with this case?
Thanks
to psyclown,
first of all, i want to make a correction regarding the side panel mesh. the mesh is screwed to the panel, not riveted, like i previously mentioned before. my bad... so it's a good news for you.
i guess there's no replaceable part for this casing; you have to buy the whole thing if you end up screwing your case while modding. as usual, the manufacturer won't take any responsibility for any modding activities.
this case is made by Sonic Gear (i think!) and maybe its distribution doesn't cover many countries. furthermore, i think there's a lot more competitive casings out there by now that attract more attention.
i assume you're talking about the power button right? this takes some getting used to actually. if you're familiar with PC installation, you might be familiar with all typical cables and connectors that any casing should provide such as RESET, POWER, HDD LED, POWER LED, SPEAKER, USB etc etc..it's all there and they are labeled.
cheers..
Ok, cool. Thanks...Cant wait to get started!!
Will let you guys know how I did.etc
OK...well iv succesfully changed chassis and its the Atrix Powerlogic 5000 metallic black...AWSOME CASE!!! It was my first time to move components accross and was easy. The thing which I dont like about the case is that the cables for the RPM for FAN1 and FAN2 arent done nicely as you have to buy an adaption for them to work. Also the thermal sensors are rather diffucult to place on your VGA,HDD,CPU. It looks fairly easy to mod as I will probably remove the mesh with the sponge and all and just drill holes in the perspex.
What size fans does the front need and how will I install the front fans?
Also how do I COMPLETELY remove the cone from the side pannel?
I also have NO CLUE on how to get the CD ROM sensor thingy working (think it tells you if the CD/DVD is spinning, right?)
Any help would be greatly appreciated.
Thanks
Oops, the above annonymouse message was from me. sorry for that. Forgot to insert my name. lol
Nice to hear that you've already worked on your casing!
About the front fan, I'm not even sure about the size myself, it could be 80 mm, 90 mm or 120 mm fan. you might have to measure it, and it's difficult to do that.
Did you get a piece of paper which is the manual for the casing? If you don't, try clicking at my top blog entry for the pics of the manual I scanned myself. The manual gives you instructions on installing the sensors, and yes, it's a tedious job.
To tell you the truth, I didn't use most of the functions anymore. having 3 HDDs really mess things up, so I just leave only the LED display powered up.
oh thx a bunch for the info banjarconverto. couldnt find the time to view this blog for some time..really appreciate ur help. i'll say this again, thank u thank u thank u! ^^
Well im loving this case and so is everyone who has seen it.
The front takes 2x 80mm fans (I have 2 80mm front fans, they damn noisy!)
I have completely removed the cone (yes, it was quite a mission removing the mesh fron that plastic)
I now wanna drill a hole into the HDD case so I can put it in the other way so I can plug the cables in from behind the case so when I replace the mesh with perspex it will look neat inside....the problem is that if I drill it with a normal drill I wont be able to use that screw which you can unscrew with your hand, will I?
Also please if anyone needs a good PC forum, please join http://janvdl.phpnet.us/page5.html
thanks
Oops, forgot to add this.
I have the piece of paper (manual) which came with the case. I dont see how it is possile to pug thoes 2 pins into thoes holes as the IDE cable uses them? WTF?
That makes no sense to me!!
yes, the method of installing the RPM sensor pin seems impractical to me; this is one of the weakness of the casing. However, I don't know how other branded casing achieve this part, I mean what sort of implementation they use.
I just visited PC Fair in Kuala Lumpur yesterday (the biggest exhibition), and I notice at SonicGear booth, this casing is still being sold at RM169. I noticed that many were interested with it. There were many more latest casings from Sonic Gear, maybe not under Power Atrix line, and they are all good-looking.
im a proud owner of this casing too.. bought it bout a week ago, n at a much pricier price too.. rm200++, coz i didnt buy it in kl.. but i pretty much satisfied wit it.. it looks good, but not too much bling.. that display lcd at the front is really an eye opener.. most of my friends like it coz of that lcd display.. i like the fact that its completely screwless, n that light thing at the fron really looks pretty at night.. its not top quality though, i suffered a cut on my finger trying 2 remove that metal thingy on the floppy drive slot.. n the manual is completely useless.. til now i still couldnt find how 2 hook up the fan so that the front lcd can display the rpm level.. n the worst thing is, i cant put back my left side panel back on coz my hdd cables is sticking out.. perhaps they didnt make it wide enough.. but other than that, im satisfied wit!!
csr,
hmm...at RM200+, where did you buy it? anyway, it's okay..i did notice in KL area that it's price hasn't been reduced as well.
and i had to endure the same thing too..almost got some cuts on my fingers while fiddling inside it..
hehehe
I think you can only get the cd/dvd rom sensor to work if you only use 1 dvd drive. You can then plug the connector into pins 25 and 26 on the spare ide connector half way along the cable. It works for me.
I still haven't managed to get my HDD sensor to spin though...I can't seem to find the right cable?
I think my case is excellent - and nothing has broken yet!!
I found this site as was looking for information about this case myself. Saying that the pictures wouldnt work on my browser but sounds exactly like my atrix 9001c4 gaming case i just bought in the uk for 55 pound. It did however come with a 550w psu.
The fan sensors, like everyone else i cant get to work. Ive already had off the heatsink plastic floom as it didnt fit.
The CD drive activity pin i have got working as i counted up to the correct pins (25/26) on the ide connecter, then turned it around, took off the back and basically stabbed the activity connector through the plastic cable so it goes into the correct pins but from the back. Seems to work.
Fan rpm sensor i have just plugged straight into the 3 pin cpu fan, but that leaves the motherboards 3pin cpu fan socket empty which means it throws out 'fan failure' everytime you boot, and i cant find a option in the bios to turn it off.
I did manage to take the fan1 pins and stab them into the back of the 3 pin connector, so that it it plugs into the motherboard and is connected to the lcd, but i didnt turn it on to see if that worked. Will probably blow something up.
Nice review... i was very happy to bump on this blog while googling for 5-6 keyword.
actually I owned this casssing for 2 month but i have never test it because my hardware item is not ready.. XD ie. motherboard HDD DVD etc. i have not buy yet. hahaha im a poor person but wanted to buy a high end rig so this happen to me. i have to buy 1 buy 1 and wait until my money reach to point i able to buy the item. hehhe..
I buy this case with the price RM160 i think this is the lowest price i could get after roaming in the lowyat plaza a couple of time.
Because i dun have the hardware to let the technician just setup into my newly buy cassing i ask him to demo on how to install all the thing briefly.
The demo shown to me was very intersting as it shows how easy we can install all the hardware easily without using any tool like screw drivers when using the cassing. i cannot forget how easy to open the cassing just in 3 simple step, 1 take out the screw 2 take out the upper bezel and 3 take out the side panel and all only used 1 screw.
Ok enuf for the added review... XD
i found that u guys have problem installing the fan. actually there are three connector to make the fan work. 1 is for the power for the fan which is same as the ide power cable. and the 2 3-pin connector labeled fan1 and fan2. how actually the fan and the rpm lcd panel work. fist the fan we have to used is the fan that have three pin that is normally slotted to motherboard to cassingfan. connect the 3 pin cable of the fan to the 3 pin slot. and the power must be sloted into the power slot. sorry i cannot remember much. but using logical reasoning it should work.
For the side panel modding maybe you all can have a look at lowyat.net forum in cassing MOD section. I found there few LYN members who mod the cassing by swapping the side panel and they drill the back panel and put the arcalyx. It was very nice and we do not sacrifice the good air ventilations in the cassing.
And for my questions what is the best way to fix the termal sensor. because the technician at the shop i buy the cassing tell me to stick the sensor as close as we can to the source of the heat.
ok thats all i can say, sorry if i mistype anything. im very bad at english writing.
To Rvymax,
nice to hear your story regarding the casing though. It's good for you to get at least someone to demo to you about the casing. And thank you also for the heads up regarding the fan installation, modding and sensors. Even I don't fully utilise all the function of the casing at the moment..:).
Have fun..
yesterday I bought Atrix5000 and there was problems with the following connectors :
1. 2-pin x1 connector (green/black)
2. 2-pin x1 connector (white/black)
*** these for POWER_SW (power switch right ?)
3. 3-pin x1 connector FAN1
4. 3-pin x1 connector FAN2
I didn't get it to connect motherboard (gigabyte GA-M57SLI-S4) because I didn't know where it should be connected,, on motherboard has for RESET-connector, Power-LED connector and Power-switch. please help me guys ,,,,
To java tuning,
Hang on buddy, I'm looking at your mobo specs right now. The way I understand it is that you're having trouble connecting those connectors to the right point on your mobo ,right?
Or have you found your solution already (sorry I was too late at seeing your post here)?
to java tuning,
I've looked at your mobo manual pdf and found that you should be looking at page 26 regarding F Panel (Front Panel Jumper). It give details information about the type of connection it provides, complete with wiring orientation just in case you worry about positive and negative contacts.
However, this will only serves your first two connectors. The last two (FAN1 and FAN2) poses confusion to me as well. Look for post from 'Nujra' above and how I reply to the same problem. Till now, I still leave them unused.
Cheers.
Kewl page...nice one :)
well...i just bought myself this case this morning (i blew up my PSU on friday, and decided to change the casing as well XD)
well...i put everything together and it seems to works fine for me...(except for the CD (i have two drives) and FAN-2 (donno where to put it)
but i manage to plug in the FAN-1 cable...
i just plug it in to the CPU fan cable...directly...normally i put the cable on the motherboard to get the power and RPM sensor on the BIOS...
now....i just connect the CPU fan to the FAN-1 cable and it works fine....but the motherboard will no longer detect your fan speed :p
and as for the temperature sensor (VGA CPU and HDD) i just put it near the item (slid it under the cooler, above the processor, stuck it on the VGA chip and near the HDD XD...it works (or so I thought :D)
i bought this atrix 2 weeks ago. and at first i couldn't close the case when i plug all my 4 hard disk drive. but my friend told me i should buy a "L" SATA cable. i bought it and he was right. it fits perfectly :)
the ROM RPM monitor is kinda useless, my mobo (IP35 pro) has only 1 IDE header so all i can do is to use that for my DVD ROM and my DVD RW.
the breathtaking part was when i plug the FAN1 and FAN2 cable into the power chord (i fitted!) from my corsair power supply. corsair has a cable that perfectly fit the fan connector. and the result is predictable, the monitor burned :( (but the LCD survived)
thank gods my mobo is still able to run.
now my atrix only have the bling-bling without any monitor :D
to V,
Thanks for sharing your experience with us. Thank god your mobo still okay :)
Yes, I have found difficulty to handle the SATA cable routing as well, I had to carefully bend the cable though. Seems that I have to look for this 'L' SATA cable as well. Thanks for the heads up.
hi, nice review..
i'm indonesian.
i just bought these casing from my friend couple days ago. he sold his computer, n buy a notebook. i manage to convinced him to replace this awesome casing with a new powerlogic azzura. i spent 400.000 rupiah for that, plus a 600 watts powerlogic PSU for me.
the problem is, as others said b4, i didn't get the idea how to connect fan1, fan2, n cd rom (rpm sensor, i suppose). n the crap is, my audio front panel's off! it works at my friend's PC b4 i bought it from him. i did plug it at the right place. i'm using MSI K9NGM-L (AM2).
can u tell me how do i resolve it?
tough this is a used casing, i'm glad to have it, coz it's my dream casing. i never managed to buy a new one, coz it'll cost me around 600.000 rupiah, n a 300.000 rupiah for its PSU.
thx!
hi there...nice case there..
how many 9cm fans can be fitted at the side panel..
thanks:)
Great review, I'd really like some help with my case though, as you seem to know a lot about it.
Where do I plug in the fan sensors? I've read that I plug them directly into the fan plugs but is that true?
Would I put fan sensor 1 into the cpu fan plug, and not put it into the motherboard?
Also, it doesn't matter where I put the sensors, I always get zero degrees of heat. Any suggestions?
to bibia, john and tom,
i'm sorry for taking such a long time to reply. currently, the casing isn't with me as i've kinda lent it to my friend, so it's kinda difficult to answer all your questions. however, i appreciate your concern and interest in the review.
to help you all, i provide a link to the casing manual : http://video-card.blogspot.com/2006/07/powerlogic-atrix-5000-manual.html
In that entry, I've posted the JPEGs of the manual, so that you can see them. It'a a very simple manual but hopefully you'll find solutions to your queries.
Cheers!
sorry, i think the link to the manual above doesn't work. what you can do is browse the archive for July 2006.
My entry for the manual of the casing should be there!
atrix makes prettl decent cases that look good
http://www.atrixlts.com/Atrix/Product_Detail.asp?ProductID=258
i bought this one for about us $30
does this case comes with PSU? and if yes how many W is that ??
This is really good review. Simply great nothing else....
Regards
Alienware Laptop Video Cards
hi again..
this my second post here after my last post on may 2007. my full comment on atrix 5000... its a nice case for a cheap price. and what are you know... im still using it and still love it.. i also have mod some of the part so it wont look old.. hehehe.. anyway.. this blog have been no 1 resource for atrix 5000 casing.
Loking at the post there are few people confusing how to setup the panel. i think i have explain about the fan, now for other part HDD, CD-rom, and thermal sensor.
ok for HDD, look for cable with HDD tag on it. and connect it to the HDD LEd on your motherboard, refer ur mobo manual.
CD-ROM, ok to make ur CD-ROM work you have to connect ur CD-rom to the 2nd or last port on the cable. so you can connect the connector to the first IDE slot on the cable. please refer to the manual to know which hole you have to install the connector, becarefull to check the connection twice cause im afraid this will cause problem to ur CD-rom or ur system.
and lastly for the thermal sensor, put anywhare closest to the thermal source so it will get accurate reading, i wouldn't say that this sensor are 100% accurate but i know i love it when it gave me alarm when the sensor exceed the threshold value, it just variate aroun 2-3 degrees and that is acceptable for me.
and play around with the front panel setting you will learn something about it. for example how to setup the threshold value of the temperature.
and if anyone know how to disable the alarm sound. coz i see a sound icon on the panel but dont know what key combination to use to disable the sound. coz my fan sensor already wearing out. so the alarm always sound when it detect the fan slowing down. kinda annoying a lil bit. although it tells me to check and install a new fan... hahaha.. im lazy to put off the front panel and install the fan.
anyway, did you know that you can put two extra fan at the back of the front panel to cool down ur HDD?
and more mod that i come with, paint all the inside black... it look nice to me... cut out the the black part on the door so u can see ur cd rom.. and seriously it look super cool when you on the LED.
and thats all from me
to RvYMAX Online,
Thank you very much for your input regarding this casing. I truly appreciate your contribution. Hopefully, those who comes to read this entry will read all the comments as they contain many useful extra information, just like the one you've posted. thank you again.
to torrent,
when I bought the casing, no PSU was included. However, I'm not sure if there are some retailers who might want to bundle it with one.
to Laptop Video Cards,
Thank you..:)
Hi there guys, i have just been given a gift of the atrix 9001 case which is similar to the one reviewed here. Only problem is that it its not working :(, what i mean is that the mobo, power source etc is broken and i would like to mount my own mobo and power source in there. Being a secondhand case, i dont have any instructions as to where the lcd display plugs in! could any of you point me to a manual or give detailed instructions as to how i can plug everything in without blowing the thing up? I am fairly computer savvy but i would prefer to have instructions before taking my pc apart!
thanks in advance guys!
pookiepet,
i'm not sure how similar atrix 5000 can be to atrix 9001 but here's the link to my entry for atrix 5000 manual:
http://video-card.blogspot.com/2006/07/powerlogic-atrix-5000-manual.html#links
they are scanned image of the manual. save them and hopefully it helps. all the best!
That looks attractive, thanks for sharing your experiences!
hi
i got a casing powerlogic 5500 p4....almost the same with this one....the problem i having is that my front panel led screen display very weird number....i need help please give me solution
Are you kidding me? This is a pimped out CPU casing. I love the concept too. The black and blue components complement each other. But you didn't post the specs of the hardware. I would love to see it.
Post a Comment
Subscribe to Post Comments [Atom]
<< Home